Customizing the program to suit
your company needs
When you become a licensed user, you can access the
Company Control screen by going to File Maintenance on the main screen and
choosing Edit Company Controls. Fill in
information about your company at the top of the screen. Items with an asterisk
must be filled in in order to get authorization to use the program in the
future.
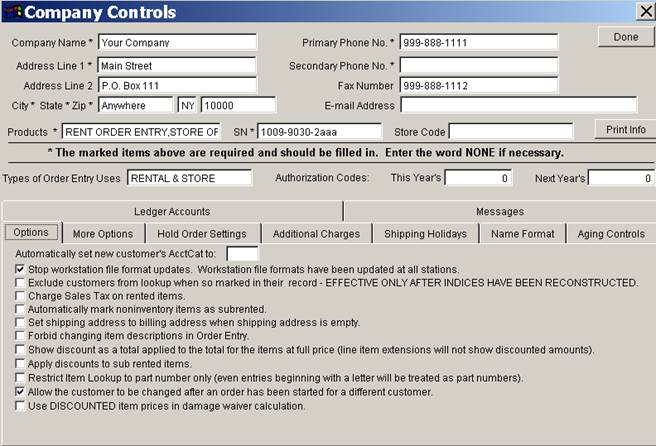
There are two types of uses – Rental and Store. One of
them will be chosen for you [by Basis] [as well as email or website address
space].
Note the Tab Sections at the lower half of the screen:
Ledger Account and Message, as well as the smaller tab sections: Options, More
Options, Hold Order Settings, Additional Charges, Shipping Holidays, Name
Format and Aging Controls. All of these sections are important to setting up
your Company Controls.
The box at the top labeled “Automatically set new
customer’s AccCat to” is a specific option for
one-time accounts. Checking this box allows these accounts to be entered
temporarily, but they will be excluded from lookups in the future. Only repeat
customers will come up. If they start
doing repeat business, the box can be unchecked and they will appear as regular
customers.
1) Stop Workstation File Format Updates
This feature insures that all
workstations are updated with the newest version of the program. When you
receive a new version from Basis USA, changes may be necessary and these
changes must be made at each workstation.
To make certain that all
workstations are updated to the most recent workstation control file format,
this box must be unchecked. Since there
is no harm in updating the workstations more than once, it is recommended that
this box be left unchecked.
NOTE: When workstation file
formats have been updated at all workstations,
this box may be checked so that the message doesn’t keep coming up, asking if
workstations have been updated. However, if you choose to check it, you must
remember to turn it off before a new version of the program is being installed.
2) Exclude Customers from Lookup When So Marked
in Their Record – EFFECTIVE ONLY AFTER INDICES HAVE BEEN RECONSTRUCTED
Checking this option changes the
way the index works. On the Customer Info screen, there is a big box to check
to exclude a customer from look ups. When you check this box and rebuild the indices, the customer
checked won’t be found by name or phone. They will only be found by Customer
Number.
This is a good way to avoid
having a bad customer come up every time you are looking up a name. The customer is still there, and the history
is still there, but you can only get to them by customer number. They won’t keep popping up when you are doing
lookups by name or phone.
3) Charge Sales Tax on Rented Items
How you use this option depends
on the sales tax laws in your state. Checking this box causes sales tax to be
charged automatically on rented items.
In some states, rental businesses
don’t want to charge sales tax. In
California, for example, sales tax is paid on an item to be rented at the time
it is purchased. No more sales tax ever
needs to be charged on that item. Renters in California leave this unchecked so
sales tax is not charged, because they have paid tax already. In New Jersey, that option doesn’t exist, so
sales tax must be charged on rented items and the option is left unchecked.
4) Automatically Mark Non-Inventory Items as
Sub-Rented
Checking this box allows you to
have a report of sub rented items. The system will put an “X” item in because
that item is not in inventory and it will then be assumed to be a sub rented
item. If you do not check the box, the
item will show up on the X item list, but not on the sub rented report.
5) Set Shipping Address to Billing Address When
Shipping Address is Empty
Checking this item makes
deliveries easier. The delivery person always looks in same box for the address
and there is no confusion about which address is the shipping address. It’s always in the same place, even if it’s a
repeat of the billing address.
6) Forbid Changing Item Descriptions in Order
Entry
This option is a safeguard. When it is checked, it prevents clerical
staff from changing the description of an item. It insures that the description
of items on the normal Line Items yellow form cannot be altered.
7) Show Discount as a Total Applied to the
Total of the Items at Full Price (line item extensions will not show discounted
amounts)
If this box is checked, any
discount given will show up at the end on the total amount of the order, even
if the discount is only applied to one or two items. It won’t be reported for
any particular Line Item. You will have to look at the detail to see which
items were discounted.
If you want to show the discount
on a particular item (e.g. largest item), you want to do Line Item discounting
and leave this box unchecked. If unchecked, each item extension price shows the
discount.
8) Apply Discounts to Sub-Rented Items
If this box is checked, sub
rented items (items that came from someone else--not from your own inventory)
will not have discounts applied to them.
Sub-rented items will automatically be excluded from being calculated in
the discount.
9) Restrict Item Lookup to Part Number Only
(even entries beginning with a letter will be treated as part numbers)
This box is for those who deal
only with part numbers. Checking this
box is a way of eliminating confusion between number and description. It is
rarely used and not recommended because descriptions start with letters are
preferred.
10) Allow the Customer To Be Changed After an
Order Has Been Started for a Different Customer
When this box is checked, you can
change the customer to a different customer even after you’ve entered the
order. For example, sometimes you start out dealing with a caterer, but then
the caterer makes arrangements with the customer to deal with you directly at a
lower cost. The caterer’s customer then
becomes your customer and it’s necessary to change the name on the order.
11) Use DISCOUNTED Item Prices in Damage Waiver
Calculation
If you want to calculate the
damage waiver on the discounted price and show this on the invoice, check this
box. If you want to calculate the damage
waiver on the higher price and NOT show this on the invoice , do NOT check this
box.
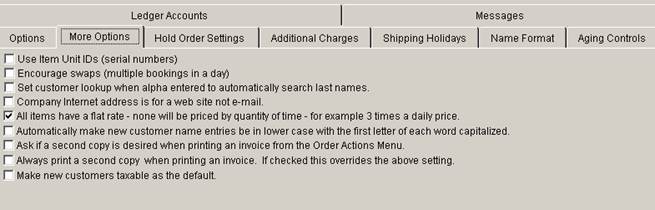
1) Use Item Unit IDs (Serial Numbers)
Checking this item permits the
use of serial numbers.
Some rental businesses, such as
amusement rentals, have all items identified by serial number. Businesses not
using serial numbers should leave this box unchecked.
2) Encourage Swaps (Multiple Bookings in a Day
This option is also primarily for
amusement rentals. Checking this option allows multiple bookings of a particular
item on the same day. In other words,
the same item can be used for more than one event in a day. This option makes
“swaps” easier to do.
3) Set Customer Look Up When Alpha Entered to
Automatically Search Last Names
If this box is checked, look ups
will be based on last name. If this box
is not checked, look ups will be based on company name (when you type in
letters).
For example, if you have a
customer named Mary Smith at Happy Time Daycare Center, check the box to look
up Mary Smith (or any other person’s name).
Do not check the box to look up Happy Time Daycare Center (or any other
business name).
4) Company Internet Address is for a Website,
not email
If you check this box, the email
address is changed to the web site address.
This affects what appears on invoices, headings etc.
If this box is unchecked, the
email address will appear.
5) All Items Have a Flat Rate. None Will Be
Priced by Quantity of Time (for example,3 times a daily price)
This box is usually checked for
party rentals, because party rentals are typically by event. It doesn’t matter
how many hours or days the item is rented. When this box is checked, the flat
rate is applied to every line item. (If a rental is time-based, the pricing and
descriptions change).
6) Automatically Make New Customer Name Entries
Be in Lower Case with the First Letter of Each Word Capitalized
When this box is checked, initial
capitalization is in effect. It can be turned off temporarily (unchecked) if
not appropriate, e.g. “McEnroe” requires a capital in the middle of the word.
7) Ask if a Second Copy is Desired When
Printing an Invoice from the Order Actions Menu
Checking this box will prompt you
to answer “yes or no” to the question.
8) Always Print a Second Copy When Printing an
Invoice. If Checked, this Overrides the Above Setting
If this isn’t checked, it will do
#7
9) Make New Customers Taxable as the Default
This box should be checked. It’s
unusual if it isn’t.
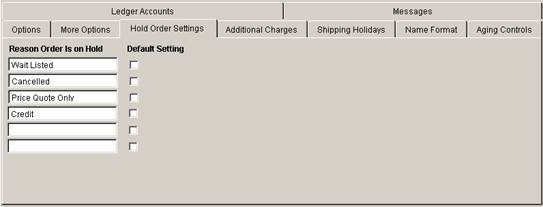
This screen indicates the various options available for
holding an order. If any box is checked, the order is put on hold.
Wait Listed: If this box is
checked, the item is already booked for the time the customer wants it. These orders can be processed, but only if
held orders are included by answering a question in the production process.
Cancelled: If you check this
box, it actually changes the status of an order. (It cancels the order). This
means that items are not reserved and that the order cannot be processed
through any form of production.
Price Quote Only: Checking
this box also changes the status of an order – to a quote. Again, this means
the items are not reserved and the order cannot be processed.
Credit: If you check this
box, a customer’s order will be put on hold if there is a problem with their
credit. It will have to be cleared before the order can be processed. These orders can be processed, but only if
held orders are included by answering a question in the production process.
Additional charges that will appear on the invoice are
listed on this screen.
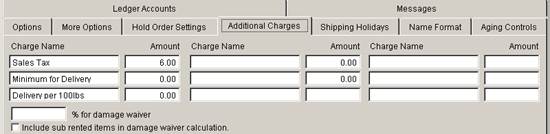
If there is a sales tax, it must be indicated here, in the
#1 position under Charge Name. Then the percentage should be entered. (6.00 = 6%)
Minimum for Delivery: If there is a minimum amount charged
on every delivery, it has to be indicated here to be automatically included.
Delivery per 100 lbs.: This entry is for those who
calculate delivery charges by weight. Enter a price per 100 lbs.
Fill in this box if you charge for damage waivers. Normally 7.00 = 7%
If there are sub-rented items (obtained from somewhere
other than your own inventory), here is where you indicate whether they will be
included in the damage waiver calculation.
Not used.
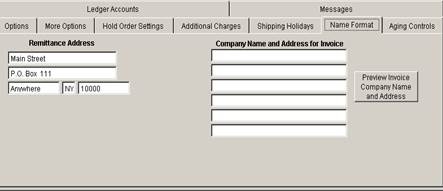
This screen allows you to see what your name will look
like on your invoice. The Remittance Address goes on statements, and it can be
different than the Company Name and Address that appears on the invoice. This is the place to indicate the
addresses that you prefer.

The Aging Controls screen indicates the days past due on
orders. An account can be locked if it is past due for more than the number of
days specified here. This also needs to be indicated under Hold Settings –
under Credit (see above).
When you calculate the aging, the system checks invoices to
see if any are more than the specified number of days overdue. If there are orders overdue for more than
that number of days, the records for that customer will be locked. You can enter orders, but they’ll be on
Credit Hold. They will not be processed. You choose the number of days you
allow for overdue orders. Some companies have 45, some 6o or 90 days.
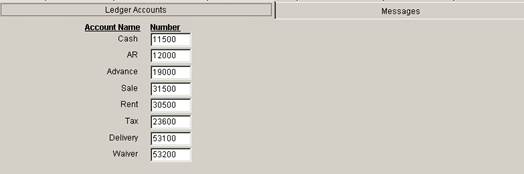
This screen should be the same for everyone. These account numbers will be applied
automatically to all transactions based on what you enter here. Check with you accountant to make sure these
numbers are correct for your business.
All of the charges for an order are separated into the
last five categories: Sale, Rent, Tax, Delivery and Waiver. The other categories – Cash, AR and Advance
-- are for recording the movement of funds.
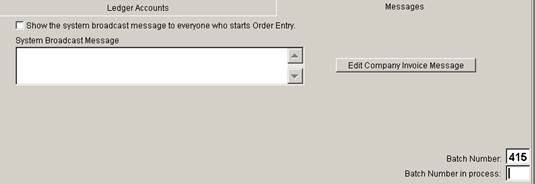
The Message Screen is for broadcasting messages to all
employees. It’s a good way to send reminder messages to employees. A system
broadcast message will show up on every employee’s screen if this box is
checked.
The Edit Company Invoice Message appears on every single
invoice that gets printed. It’s a way to send a message to all of your
customers, e.g. “Happy Holidays” or “this is our new fax number.”